How to Integrate Fansjet with WooCommerce
Created on 2 February, 2024 • Integrations • 141 views • 1 minutes read
Find out how to integrate fansjet social proof with WooCommerce
Integrating WooCommerce with Fansjet: A Step-by-Step Guide to Setting Up Webhooks
This guide will demonstrate the process of establishing a webhook connection between WooCommerce and Fansjet, enabling the utilization of WooCommerce data within Fansjet notifications.
Step 1: Establishing a Webhook
To start integration, WooCommerce requires a specific "Webhook Trigger URL" that directs data to Fansjet.
To get the unique Webhook Trigger URL we need to first create a Conversions or Conversions Counter notification on throug the campaign (domain) we want the notification to appear on.
Then we meed to copy the webhook trigger url from the Settings -> Data tab.
Step 2: Configuring WooCommerce for Integration
First, access your WordPress account and navigate to the WooCommerce settings:
- Go to
WooCommerce > Settings.
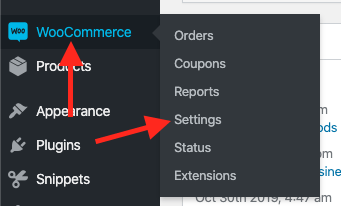
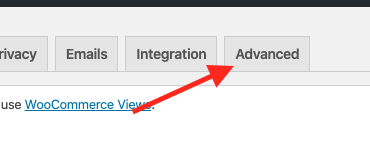
- Select the
Advancedtab.
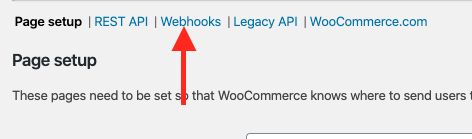
- Proceed to
Webhooks.
- Click on
Add webhookto create a new webhook.

In creating the webhook, you'll need to specify several settings:
- Name your webhook for your own reference.
- Set the webhook status to
Active. - Choose the topic for the webhook trigger. For optimal use, selecting
Order Createdis recommended. - Insert the Fansjet Webhook URL you crafted in the initial step under webhook data settings.
- After configuring these settings, click
Save Webhookto finalize the setup.
Ensuring Webhook Functionality
If upon the first attempt the webhook does not capture all necessary order fields, consider executing another test order to verify its functionality. It may take a couple of minutes for WooCommerce to dispatch the webhook to Fansjet.
At this point, Fansjet stands by to receive a webhook from WooCommerce. Upon the creation of an Order (or any selected Topic), WooCommerce will transmit a webhook to Fansjet, facilitating the use of this data in Fansjet notifications.